
This Battleship PowerPoint template can be used to review with your class before big tests and exams! It’s SUPER cool because it requires a little bit of strategy to win, but, it’s probably the most complex PowerPoint game template that I’ve created.
 While easy to use, I don’t recommend it for teachers who aren’t familiar with PowerPoint’s basic animation functions.
I’ve included the instructions directly from the PowerPoint file below so that you can get an idea of how it works.
Click here to check out this game template on Teachers Pay Teachers. 34 slides, includes basic animation, sound.
***How to set up this game template***
1. Come up with 32 review questions and answers.
2. Type the questions into the “Type review question here.” text boxes on slides 3-34. One question per slide.
3. Keep a list of the questions and answers with you, so you know what the answers are (just in case you get caught off-guard).
***How to play Battleship***
1. Divide your class into two even teams. It’s fun to do boys vs. girls if the numbers are roughly equal!
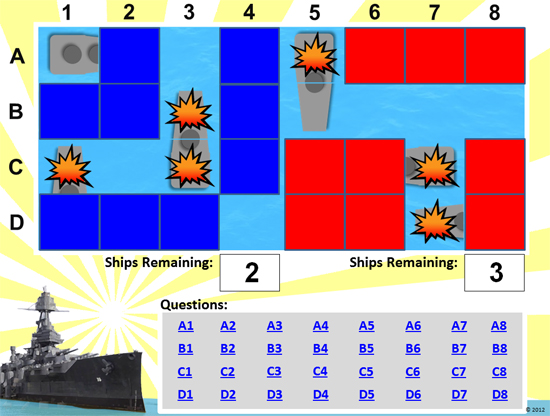
2. Have them sit in a groups (with their teams) and have each team select a captain. The captain is the only person who can pick squares and provide answers. It gets too confusing, otherwise. One team is the Red Team and will try to destroy the three ships hiding beneath the blue squares. The other team is the Blue Team and will try to destroy the three ships hiding beneath the red squares.
3. Choose which team will go first. I like to flip a coin.
4. Have the first team select which square they want to attack. Then, click on their selection in the gray “Questions” box. This will take you to the question that corresponds with that square.
5. Read the group the question. Give them 1 minute to discuss and provide an answer.
6. If the answer they provide is correct, click on the “Return to Board” box. Then, click on the box that they selected. IF there is part of a ship behind that box, you can click on the ship and a bomb will explode on it. After the box has been clicked and the ship has been bombed (if applicable), their turn is over and the other team gets to go.
NOTE: If both parts of a ship have been destroyed, you can reduce the number of ships remaining in the “Ships Remaining” text box.
7. If the answer they provide is incorrect, click on the “Return to Board” box. Their turn is now over and the other team gets to go.
8. The game continues until one team has successfully destroyed all three of their opponents ships.
***Instructions for repeat gameplay***
1. If you intend to use this template multiple times with the same class, it’s easy for them to remember where the ships (and bombs) are, so, you’ll need to move them around.
2. To move the ships, you’ll need to move the red and blue boxes first. The ships (and bombs) are underneath the red and blue boxes.
3. I suggest that you select all of the red and blue boxes (at the same time) and use the “cut” and “paste” function to move them to another slide. This will allow you to keep them all together. You can create an entirely new slide at the end of the PowerPoint and then delete it when you’re done making changes.
4. After you’ve moved the red and blue boxes, you can move the ships (and bombs) where you want them on the game board. Each half of the board should have three ships. Make sure you keep the ships and bombs that are stacked on top of each other together.
NOTE: Each of the ships are separated into two halves so that when you click on them during gameplay, both of the bombs do not go off. Each half of the ship is a button, essentially.
5. After you’ve moved the ships (and bombs) to where you want them to be, “cut” and “paste” the red and blue squares back on top of the board.
6. When you’ve made these changes, try playing the game to make sure they work correctly. Don’t forget to delete the extra slide at the end of the presentation (if you made one).
If you’re ready to play this game with your class, get it here!


